")
To realistically represent the three-dimensional space that surrounds us or comes from our imagination on a two-dimensional drawing surface, we need to learn certain techniques. By using these, we can avoid flatness in our drawings.
In order to make your drawings not look flat, you need to learn the following techniques that create the illusion of three-dimensional space on a two-dimensional drawing sheet:

1. Linear perspective
2. Aerial or atmospheric perspective
3. Depicting light, shade and shadow
4. Tonal rendering
5. Color perspective

Using these methods, you can express shape, depth, and distance in your drawings. You can apply them separately or in combination in an art composition.
The same principles of drawing still apply today. They apply both to artists working with traditional materials and techniques and to those who create their artwork with digital tools. By using these methods, you can take your artwork to a new, more professional level.
These methods and techniques were developed by the great masters of art history. Anyone can learn these techniques with a lot of practice.
In the drawings and paintings of the old masters, we can observe and study what methods they used to depict the depth of space. Copying their works of art is a useful practice in mastering drawing techniques.
In addition to dexterity, drawing also improves eye measurement and the way of seeing, which is important because only the trained eye can recognize perspective, shapes, shadows, and tones.
How do I make a flat drawing look three-dimensional?
The best way to learn how to make drawings that do not look flat is to practice drawing basic geometric solids. This will form the base knowledge of how to successfully depict all other subjects, including living and inanimate objects, landscapes, and the human body.
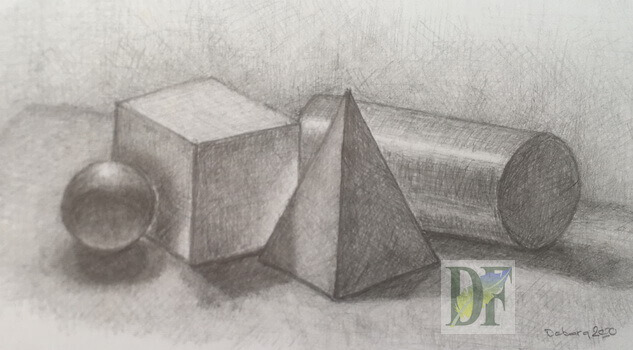
You can get geometric bodies made of wood or plastic to put together a still life composition. You can even make models out of cardboard, except for the sphere, for which you can use a small rubber ball.
1. Linear perspective
The linear perspective was developed by the great masters of the Renaissance to depict the depth of space in their works of art. Alberti, Brunelleschi, Leonardo da Vinci, and Albrecht Dürer developed this method, which is still used today, to represent three-dimensional space.
- An essential aspect of linear perspective is that the lines of objects appear to converge at one or more distant vanishing points on the horizon. The horizon line and vanishing points can be outside our drawing sheet in some cases.
- Another important principle of perspective is that as objects get farther away from us, they become smaller and the distances between them shrink.
- As a third aspect of the perspective, we need to mention shortening. Objects that are on a plane parallel to our face are visible in full size. As these objects turn away from us, they appear shorter.
- Objects in the foreground partially obscure those in the foreground.
- The horizon line is always at eye level and should be drawn even if it is not visible. Observed objects can be at, below, or above eye level.
The most commonly used linear perspective types are the one-, two-, and three-point perspectives.
One-point perspective
A single vanishing point is defined on the horizon line. The orthogonal lines converge at this point. The transversal lines remain unchanged.

Two-point perspective
The orthogonal lines converge at two vanishing points located on the horizon line.
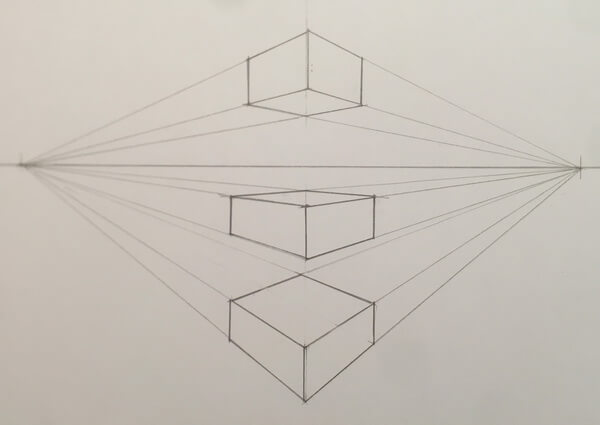
Three-point perspective
Suitable for representing very tall or deep objects. In addition to the two vanishing points on the horizon line, a third point is defined above or below eye level.

Circle in perspective
The circle looks like an ellipse in perspective

2. Aerial or atmospheric perspective
As objects move farther away from us, their lines become less sharp due to the atmosphere, the shapes become less visible, and the colors become less vivid.
In our drawings, therefore, we draw objects farther away in less detail than near ones, their tonal values are less contrasting as they move away, and the lines and edges of the shapes are less sharp. The colors will be cooler, bluish.
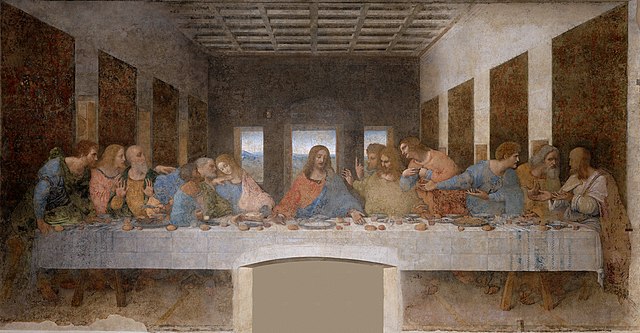
Leonardo da Vinci masterfully applied the atmospheric perspective in his works.
In his notes, Da Vinci wrote the following about aerial perspective:
“You know that in an atmosphere of equal density the remotest objects seen through it, as mountains, in consequence of the great quantity of atmosphere between your eye and them—appear blue and almost of the same hue as the atmosphere itself”
„The medium lying between the eye and the object seen, tinges that object with its color, as the blueness of the atmosphere makes the distant mountains appear blue”
“Hence you must make the nearest building above the wall of its real color, but the more distant ones make less defined and bluer. Those you wish should look farthest away you must make proportionately bluer”
If you are interested to learn more about this topic, I recommend my article on perspective in drawing.
3. Depicting light and shadow
On objects, we can observe the light, which is the brightest part that the light source illuminates.
Two types of shadow can be observed on objects:
- One of them is the shade (also referred to as the core shadow or form shadow), which appears on the object itself, on the parts that are not illuminated directly by the light source.
- The other is the cast shadow that the subject casts on its surroundings, on the side opposite the light source.
The shade defines the shape of the object itself, and the cast shadow helps determine its spatial position. The shade is always lighter than the cast shadow due to the rays of light reflected from the environment.
The shadow also depends on the type and direction of the light source. Objects can be illuminated by sunlight, which is a natural light source, or an artificial, central light source, such as a lamp.
The sun’s rays fall in parallel, while the light from a central light source is radially scattered. Sunlight is constantly changing, therefore the best light source for practicing drawing shadows is a lamp that illuminates objects from one direction.
You can set up a still life composition consisting of basic geometric solids and study the light, shade, and cast shadows with the light coming from various positions.
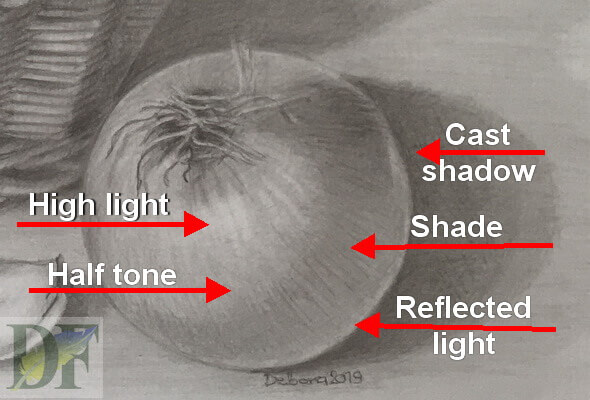
- High light is the brightest part of an object.
- The deep shade is the darkest part of an object, which is on the opposite side of the light source.
- The transition parts between high light and deep shade are called halftones.
- The reflected light is caused when the light reflects from the surrounding objects, and it appears on the shadow side of the object.
The transition between light and shade parts on spherical and curved objects is smooth and gradual. On objects consisting of flat planes and edges such as in the case of the cube, the transitions between light and shade are sharp.
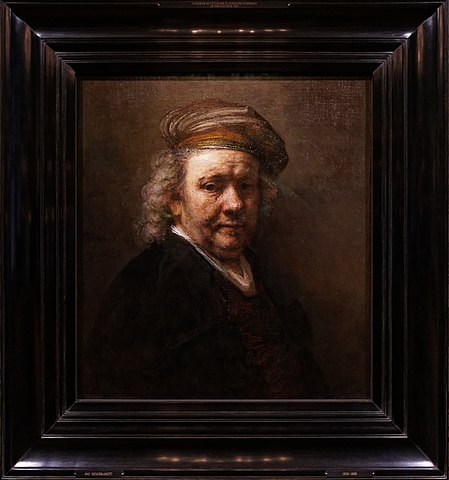
A brilliant representation of light and shadow can be observed in Rembrandt’s paintings.
4. Tonal rendering
The light, shade, and cast shadow described in the previous point can be represented in our drawings using tonal rendering.
Tonal rendering is one of the most important and basic techniques for drawing three-dimensional objects.
You can draw objects with outlines, but you can’t perceive their spatiality or volume. That requires tonal rendering.
With tonal rendering, you can create tonal values that make the drawn objects realistic. By using tonal values in contrast, you can turn planar geometric shapes into three-dimensional bodies, e.g. the circle into a sphere.
You can use charcoal, graphite pencils, or pen and ink for tonal rendering. Smearing the charcoal with your finger or a paper stump works well, but this is not recommended for graphite pencils.
When using graphite pencils or pen and ink, you can achieve different tonal values by using lines or dots.
You can hatch with lines running in one direction horizontally or vertically, but you can also apply cross-hatching in multiple layers.
Depending on the hardness of the graphite pencil, you can achieve different tonal values. With 6H, 4H 2H, HB, 2B, 4B, and 6B graphite pencils you can achieve almost any tonal value you may need. The HB pencil is medium-hard, the H pencils are hard and the B pencils are soft.
A good way to practice hatching is to draw and hatch a rectangle. Start the hatching lightly from one end, then gradually increase the tonal value to the other end of the rectangle, where you will reach the darkest value.
Gradually increase the density of lines, the number of layers, and the pencil pressure to get from light to dark tones.
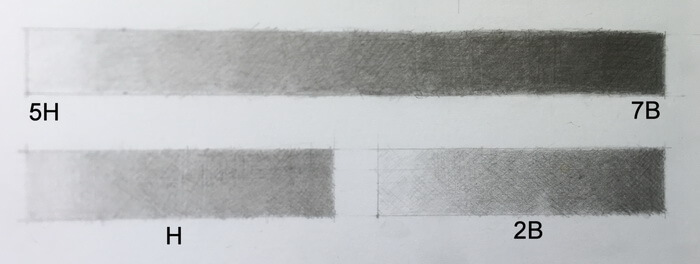
Create smooth transitions between tonal values.
You can repeat this exercise with each type of pencil, so you know the full capacity of a certain graphite hardness. A single pencil may be enough to make a complete drawing.
5. Color perspective
Colors also have a tonal value. Value is the relative brightness of each color. We need color values to represent light, shade, and cast shadows.
We can also use colors to depict the depth of space in a work of art. Warm colors seem to be closer to us in space, and cold colors seem to move away from us.
Warm colors are red, yellow, and related colors. Cold colors are blue and related colors.
The colors of more distant objects are always duller and colder due to the atmosphere.
“Take care that the perspective of color does not disagree with the size of your objects, that is to say: that the colors diminish from their natural [vividness] in proportion as the objects at various distances dimmish from their natural size.” – Leonardo da Vinci on color perspective.
While on the subject of colors, you may wish to read my article on the application of color contrast in art.
Final thoughts
You can transform your drawings from flat to three-dimensional by learning to apply these techniques developed through the course of art history.
Applying linear and aerial perspectives, tonal rendering, depicting light and shadow, and the perspective of colors are all things that make our drawings three-dimensional.
Knowledge of basic drawing techniques is important for any artist. It is important to know them regardless of whether you are creating your artwork using traditional techniques or digital tools.

Debora
My name is Debora, and I’m the founder of Drawing Fundamentals. I work as a civil engineering technician. I acquired the basic knowledge necessary for freehand and technical drawing during my school training, further developing and perfecting these skills throughout my years in the profession. Through my blog, I aim to assist anyone interested in learning to draw.