
Still life compositions are an ideal subject for novice artists. As the name suggests, still life is a composition of motionless, inanimate objects.
By drawing still lifes, you can learn to draw basic forms, light, and shadow, and how to apply the principles of artistic composition. The technical knowledge you can acquire in this way forms the basis for drawing more complicated subjects such as human figures and portraits.
The instructions below contain all the information you need to be successful in drawing still life compositions.
Drawing and shading a still life can be easily determined in the following three steps:

1. Select the objects and set up the still life composition. Choose a light source and adjust the lighting.
2. Define the outer boundaries of the composition and then draw the main shapes using the principles of perspective. Use a measuring stick to determine the relative proportions and position of the elements. Gradually refine your drawing from larger shapes to smaller details.
3. Start shading the line drawing in light tones, then gradually build up the darker ones.
The principles and techniques described below apply not only to drawings made with traditional materials and techniques but also to drawings made with digital devices.
Drawing tools and materials
Graphite pencils
Pencils with graphite hardness between 2H and 4B are best suited for freehand drawing.
Those marked with H are harder and therefore leave lighter marks on the paper. You can use them to draw construction lines and axis lines. With the softer pencils marked B, you can draw stronger, darker lines and build up darker tonal values.
You will need a pencil sharpener or scalpel to sharpen the pencils. A piece of fine sandpaper comes in handy to refine the tip of the pencil.
The best way to remove pencil marks is with a kneadable eraser, which allows you to gently erase graphite without damaging the surface of the paper.
Pen and ink
You can use a classic dip pen or a technical pen to draw with ink. There are different nib sizes for both varieties. The drawing ink is available in several colors. Technical pens require a particular type of ink.
Since you can’t erase the ink, it’s helpful to sketch with a pencil first, which you then redraw with pen and ink.
Charcoal and pastel
Charcoal and pastels are considered to be dry drawing media. While charcoal is black, pastels are available in a variety of colors.
Dry media can be smudged with your fingers, paper stumps, or a piece of fabric. The surface of the finished drawing is very fragile, so it is recommended to seal it with a spray fixative. It should be noted, however, that the fixative may change or darken the color of the pastels.
Drawing paper
For graphite and ink drawings, papers with a smoother surface are a good choice. For drawing with charcoal or pastel, a more toothy paper or board is best, available in a variety of colors.
You can use thinner paper for sketches or practice. However, for more serious works of art, heavier paperweights of at least 70-80 lb / 100-130 gsm are recommended.
Drawing board
The most important aspect of a drawing board is that it should have a smooth surface. You can attach the drawing paper to the board using masking tape or clips.
Adjust the drawing board into an approximately vertical position to draw with pencil, pastel, or charcoal. A painting easel can help you support the board. To draw with ink, keep the board almost horizontal.
Three steps to a successful still life drawing
1. Setting up a still life composition
- Select a table or stand on which to set up the composition
An important part of setting up a still life composition is to be at the right height to achieve the desired effect. You can look at the subject from above or from eye level, but you can also experiment with unusual, exciting points of view.
A decorative stand can also be part of a still life composition. For starters, still life compositions consisting of a few simple objects are best, as many or complex elements may be overwhelming at first.
An important aspect of drawing a still life is not to change your point of view and position until the end of the drawing.
Since our subject is motionless, we have time for detailed observation. I recommend that you draw from life, not from photographs.
- How to illuminate a still life composition?
The illumination of the still life composition may come from a natural or artificial source. In the case of natural light, such as through a window, it should be taken into account that it varies depending on the time of day and the weather.
For starters, the best way to illuminate a composition is with a single source of light that doesn’t change during the drawing. You can solve this with a lamp.
You can achieve different effects depending on the position of the light source. Experiment with different intensities of light coming from above, below, and from the side, noting the differences.
- Regular and irregular shapes
The choice of objects that make up a still life is unlimited, you can choose from flowers, fruits, vegetables, household objects, or textiles as you like.
Books, glasses, bottles, toys, or boxes are objects that resemble basic geometric solids such as cubes, spheres, or cones. Regular objects can also be of natural origin, such as eggs, onions, or oranges. Irregularly shaped objects include, for example, broccoli or garlic.
2. How to start a still life drawing?
- Select the format and layout of the drawing sheet
If the height of the composition is greater than the width, the portrait position may be appropriate. If the width is greater than the height, the landscape orientation is better. You can also choose a less common oval, circle, or square format.
A viewfinder can help you define the outer boundaries of your composition. Make a frame out of cardboard with the size of the opening proportional to the size of your drawing sheet. By looking at the still life through this, we can determine what our drawing will include.
Composition is the arrangement of elements in a work of art. A harmoniously composed drawing is pleasing to the eye. Learning the systems and principles of composition developed during art history can be very helpful.
- Measuring with a stick
A thin stick is suitable for the task, but you can also use the pencil with which you draw. You can determine and compare proportions and angles with this method.
Always hold the measuring stick parallel to your face, do not tilt it forwards or backward, just turn it right and left as needed. Take measurements with your arms outstretched while not changing your position. This way your measurements will be accurate.
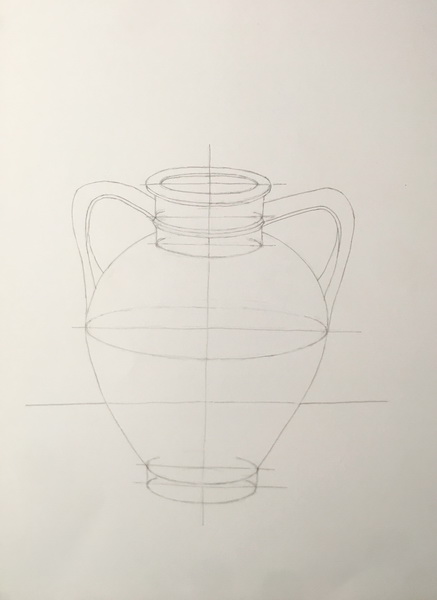
- Draw basic shapes first, then details
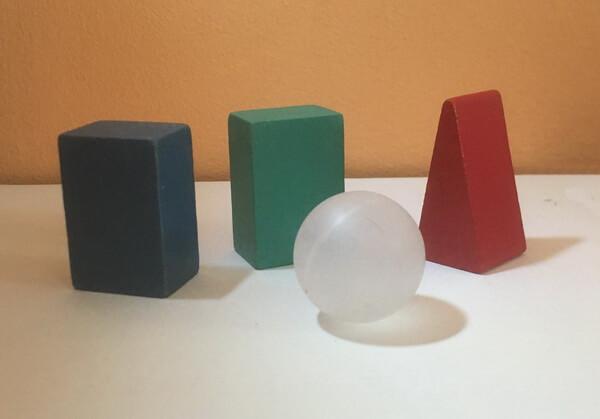
Choose an object from the composition that you will use as the base unit. In drawing the still life below, I chose the sphere as the base unit. I was able to determine the size of the other elements by comparing them to the diameter of the sphere.
I measured how many times the width of the sphere is included in the width and height of the entire composition. My composition is four times the width and twice the height of the sphere.
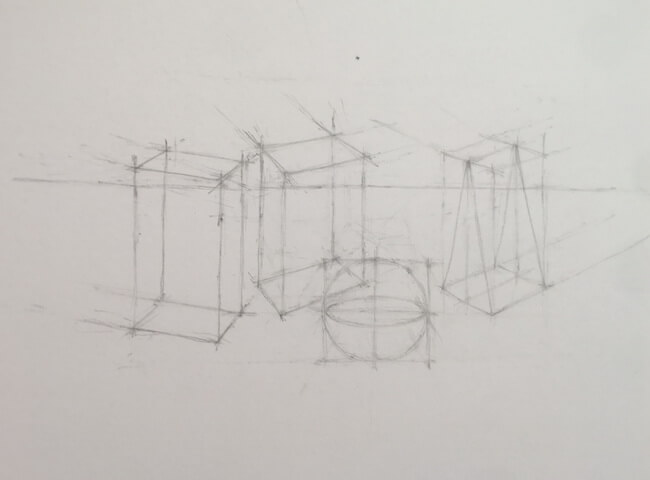
When making your drawings, always start with the larger, general forms and move on to the smaller details. Never start drawing with details. After defining the main forms, gradually develop and refine your drawing.
The use of axes and other imaginary construction lines makes it easier to construct different elements. Notice that I drew the sphere into a square, and the wedge on the right was drawn into a rectangular prism.
The construction lines were drawn with a 2H graphite pencil. I did not delete them afterward, I incorporated them into the pencil hatching, which we will study in the next step.
3. Shading the still life
Shading emphasizes the shape, volume, and spatiality of objects. We can achieve a realistic effect on our drawing by applying shading techniques. By shading two-dimensional shapes, we can create the illusion of three-dimensional solids.
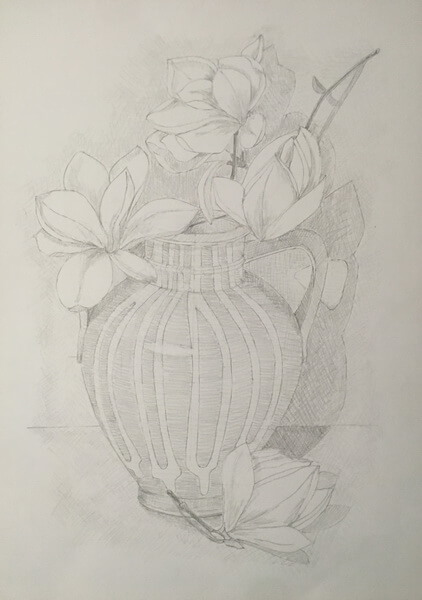
Start shading with light tones and then gradually darken them. Work on the shading simultaneously over the entire drawing surface. Don’t focus on the details in the first phase of shading.

By changing the pencil pressure, you can achieve lighter or darker tones. Pencils of different hardness also result in lines of different strengths.
You can use vertical, horizontal, or diagonal lines to hatch the drawing. By applying pencil hatching in multiple layers, you can build rich tonal values.
Alternatively, drawings can be shaded with dots of different sizes and densities. This is a technique called stippling, developed by pointillists, that we can apply nicely with pen and ink.
Smudging is not a recommended graphite pencil technique, but it is a good technique when using charcoal and pastel.
The surface material and texture of still life objects
Natural and man-made objects in still life compositions come in various materials and textures. Surfaces can be matte such as a piece of wood or glossy like metal.
For example, glass is translucent, and textiles can be coarse or silky. Fruits, vegetables, and flowers also have a characteristic texture. The presentation of materials and textures contributes to the realistic effect of the drawing.
Effect of light and shadow
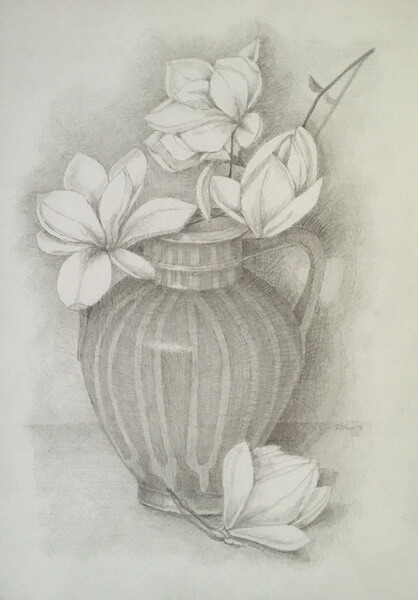
The shapes of the illuminated and shaded parts depend on the position of the light source. Observe the shape of the light parts and shadows, along with the changes in tonal values on the surfaces of the objects.
On objects with sharp edges, such as the wedge and the two rectangular prisms in the drawing below, the transition between the illuminated and shaded parts is sharp. In the case of the sphere, there are smooth transitions between tonal values that follow the shape of the object.
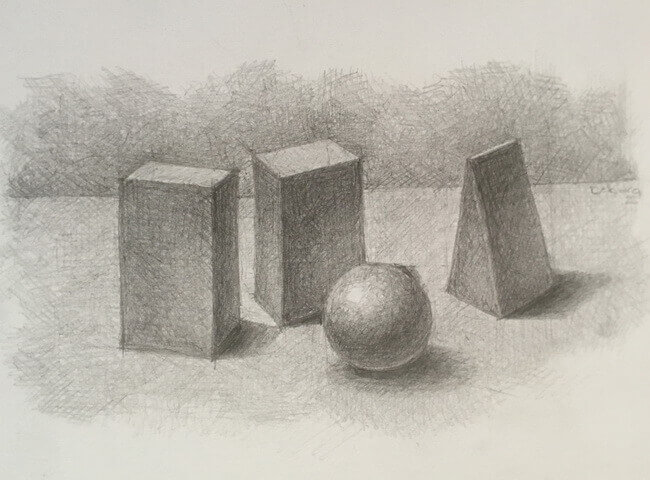
The light comes from a single point, from the left and above.
The brightest part of the drawing is always the highlight that gets direct light. The shadow always appears on the side of the objects opposite to the light. The core shadow or form shadow appears on the object itself. A cast shadow is a shadow that is projected from an object onto things around it. Shadows are always the darkest elements in a drawing.
The strength of the contrast between the light and dark tonal values also determines the mood of our drawing. With strong contrasts, we can achieve a dramatic effect. Working with lighter tonal values results in a more cheerful, lighter composition. With darker tonal values we can create a mysterious, gloomy, or mournful mood.
You may also wish to find out how to draw realistic magnolia flowers.
What techniques can we use to make our drawings three-dimensional?
In addition to shading, there are other techniques we can use to enhance the realistic, three-dimensional effect of our still life composition. By applying the principles of perspective, we can create the illusion of depth in our drawings.
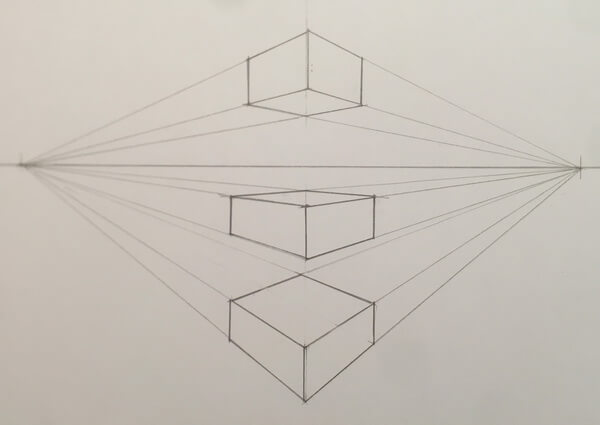
Linear perspective
In a linear perspective, the lines that are parallel to each other in reality seem to converge at a vanishing point on the horizon line.
We mostly use one- and two-point perspectives when drawing still life compositions.
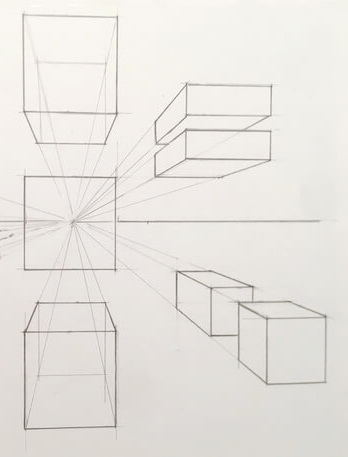
If we represent several objects in different positions, the parallel lines of each object converge toward their separate vanishing points. With the measuring stick method already explained above, we can also determine these directions and project them into our drawing in a fairly accurate way.
The horizon line and vanishing points are in many cases outside of our drawing sheet. The horizon line is always at our eye level.
Lines that are parallel to the plane of our face are visible in their actual size, they do not converge towards the vanishing point and are not foreshortened.
Diminution
As objects move away from us, they appear to be getting smaller and smaller, and the distance between them also seems to gradually decrease.
Foreshortening
Objects parallel to the viewer’s face are visible in full size. When objects are turned forward or backward, they appear shorter.
You can see this in the still life drawing, which depicts geometric solids. The planes of the rectangular solids and the wedge appear shorter in the drawing than they are in reality.
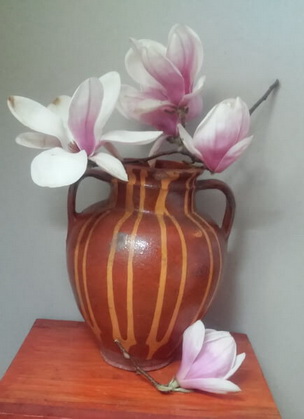
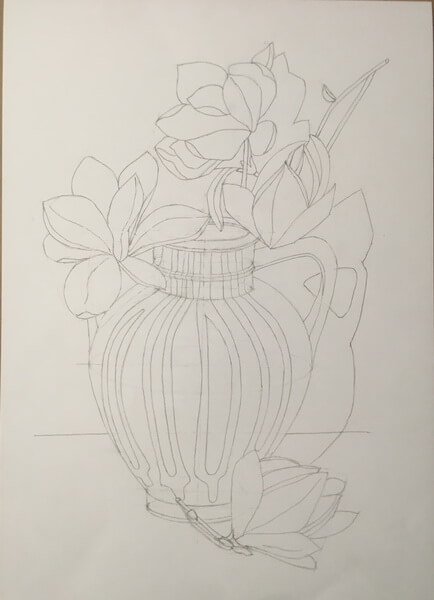
The foreshortened cube looks like a rectangle and the circle looks like an ellipse in the still life drawing of a pot with magnolia flowers.
Overlapping
Elements closer to the viewer partially cover those behind them, so overlapping can be used to express objects’ spatial position and relationship. You can also express the depth of space by drawing overlapping objects. In our geometric still life, the ball partially covers one of the rectangular prisms.
Still life examples from art history
By studying the works of great figures in art history, we can gain valuable information. It is useful to study their techniques, and the materials they have used, and learn from them.
A still life painting from antiquity
Still life painting has already appeared in ancient Roman art, as evidenced by the fresco that adorned the bedroom of a villa excavated near the Herculaneum.

Still life art from the 1600s
Still life appeared as an independent genre in the Netherlands in the 1600s but was also popular with German and French painters. Flowers, breakfast tables, hunting trophies, fruits, and valuables such as silver trays or Chinese porcelain were popular objects in still life compositions.
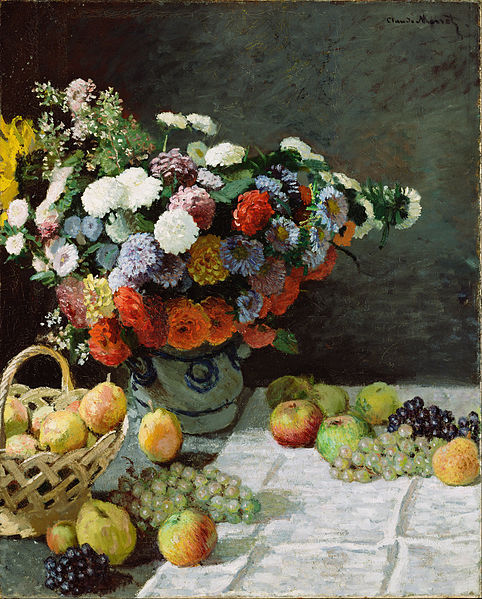
Still life in Impressionism
Still life paintings by Claude Monet, Camille Pissarro, Pierre-Auguste Renoir, Paul Cézanne, and Vincent van Gogh are known from the time of the Impressionist movement.
Final thoughts
Drawing a still life is an important phase in the training of any artist. Through it, we can learn to observe and realistically draw various geometric and organic forms, tonal values, light, and shadow.
Learning these skills is important for drawing more advanced subjects, such as human figures and portraits.
By applying and practicing the steps and techniques described above, you can successfully master the drawing of still lifes. The principles of drawing are the same, whether you choose traditional media or modern digital tools for your artwork.

Debora
My name is Debora, and I’m the founder of Drawing Fundamentals. I work as a civil engineering technician. I acquired the basic knowledge necessary for freehand and technical drawing during my school training, further developing and perfecting these skills throughout my years in the profession. Through my blog, I aim to assist anyone interested in learning to draw.