")
Drawing skills can be developed successfully through learning and practice, regardless of innate talent. If you’re eager to start learning how to draw but unsure where to begin, here are some useful tips for beginners.
As a beginner learning to draw from scratch, it's essential to start with the fundamentals before advancing to more complex techniques. Here are key aspects to focus on:

• Developing Good Eye-Hand Coordination
• Mastering Perspective and Tonal Rendering
• Understanding the Effects of Light and Shadow
• Using Materials and Techniques Correctly
• Applying Measurement Techniques and Determining Proportions

After mastering the basics, refining your drawing skills requires persistence and regular practice. The more you draw, the more precise and faster you will draw.
Drawing stands as one of humanity’s oldest activities, a powerful means of expressing thoughts, emotions, and impressions. It serves as the cornerstone of visual arts, influencing disciplines such as painting, architecture, and sculpture. Moreover, drawing is an art form in its own right, equal to others.
Learning the basics of drawing is crucial, whether you want to work with traditional materials and techniques or digital tools. The beneficial effects of drawing have a positive impact on our quality of life, whether it’s just a creative hobby or a source of income.
Drawing is a Skill Anyone Can Acquire
Drawing, much like writing or speaking, is a skill that can be both learned and taught. While some individuals may possess natural potential, it’s not a prerequisite for success. Through dedicated learning and practice, you can nurture and develop your drawing skills.
Even the most celebrated masters, such as Michelangelo Buonarroti (1475-1564), recognized the value of hard work in achieving mastery. He once stated, “If people knew how hard I worked to get my mastery, it wouldn’t seem so wonderful at all.”
1. Basic Drawing Equipment
To get started with drawing, you’ll only need a few essentials: some paper, a smooth drawing surface (a drawing board), an HB wooden graphite pencil, a pencil sharpener (you can also use a scalpel or knife), and a soft eraser.
Drawing Board
This is where you attach the drawing sheet. If you don’t have one, it’s easy to make—wood, Masonite, or chipboard in roughly A2 size will do. The surface should be smooth. Attach your drawing sheet using bulldog clips or masking tape. An art bench or easel can serve the purpose as well.
Drawing Paper
Choosing the right drawing paper is essential for achieving the best results in your artwork. For quick sketches and exercises, economical office paper (80-90gsm/20lb) works well.
For larger projects, especially those involving graphite or colored pencils, opt for thicker paper ranging from 100 to 130gsm (70-80lb). If you’re working with graphite or colored pencils, a medium-rough paper surface is recommended.
For ink drawings, go for paper with a smooth surface to enhance precision. On the other hand, if you’re using charcoal or pastels, a paper with a rough surface provides the ideal texture.
Drawing Materials
At the beginning of the learning process, consider starting with a wooden graphite pencil. Optimal hardness choices include HB, B, or 2B. Charcoal is another excellent medium for beginners.
As you progress, explore additional tools like colored pencils, dry and oil pastels, or pen and ink. It’s worth noting that drawings created with charcoal and pastel tend to smear. To protect your work, consider using fixing sprays.
Pencil Eraser
For erasing, a putty rubber (kneaded eraser) is an excellent choice. It’s gentle on the paper, leaves no residue, and can be molded into various shapes to suit your needs. Additionally, a simple white soft rubber eraser is also a suitable option.
Pencil Sharpener
Always ensure your pencil is properly sharpened for precision. You can use a conventional pencil sharpener or a scalpel and a piece of sandpaper.
2. How to Start Drawing as a Beginner?
I suggest beginning to learn to draw with larger drawings. This approach allows for effective practice of the proper hand posture and movements. Larger drawings make detail drawing easier and are more forgiving when corrections are needed.
For larger drawings, adjust your drawing board to a vertical position and position yourself in front of it, whether standing or sitting. Remember not to grip the pencil too tightly, hold it loosely. When drawing, engage your entire arm, not just your wrist, for smoother and more controlled strokes.
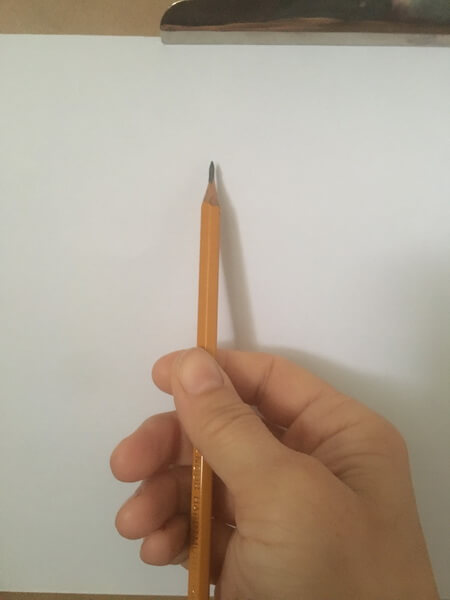
For smaller drawings, opt for the familiar pencil grip used in writing, and keep the drawing board at a slight angle, around 20-30 degrees.
3. Exercises to Improve Eye and Hand Coordination
- Step 1: Draw Straight Lines
Begin by attaching a drawing paper of at least A3 size to the drawing board set at an approximately vertical position. With loose movements, start by drawing horizontal, vertical, and diagonal lines until you can confidently create straight lines.
Next, practice drawing parallel lines, maintaining equal distances from each other in horizontal, vertical, and diagonal orientations.
Remember, when drawing lines, engage your entire arm, not just your wrist. Guide the pencil with consistent pressure on the paper to ensure lines of uniform thickness. Aim to complete each line in a single, smooth motion.
- Step 2: Drawing Plane Geometric Shapes
Once you’ve mastered the art of drawing lines, progress to practicing plane geometric shapes like squares, triangles, circles, and ellipses. Drawing a perfect circle or ellipse may take some time to master, so be patient and persistent—it’s all part of the learning process.
When correcting mistakes, it’s advisable to draw the correction by adding the corrected line before erasing the faulty one. This approach minimizes the risk of repeating the same mistake.
4. Applying Perspective in Drawing
Drawing a three-dimensional space on a two-dimensional surface isn’t an easy feat. To accomplish this, understanding the rules of perspective drawing is crucial. Although the geometric construction of perspective can be complex, we simplify it for freehand drawing.
Start your practice of perspective drawing by sketching basic geometric solids, beginning with the cube. The cube, being the simplest geometric form, is exceptionally well-suited for understanding the fundamentals of perspective.
Elements of Perspective Drawing
In perspective drawing, key elements include:
- Horizon Line: Always positioned at eye level.
- Vanishing Point: Located on the horizon line.
- Orthogonal Lines: Converge at the vanishing point.
- Transverse Lines: Horizontal and consistently parallel to each other and the horizon line.
It’s worth noting that the vanishing point (there may be more than one) isn’t always located within the drawing; it can extend beyond the sheet’s boundaries.
Objects for drawing can be observed at eye level, from below, or from above, resulting in various types of perspectives.

One-Point Perspective
In a one-point perspective, we capture objects viewed directly from the front. Here, orthogonal lines converge at a single vanishing point on the horizon line. While the depth of objects shortens, their height and width remain unchanged
To draw a cube in a one-point perspective, start by sketching the horizon line and identifying the vanishing point.
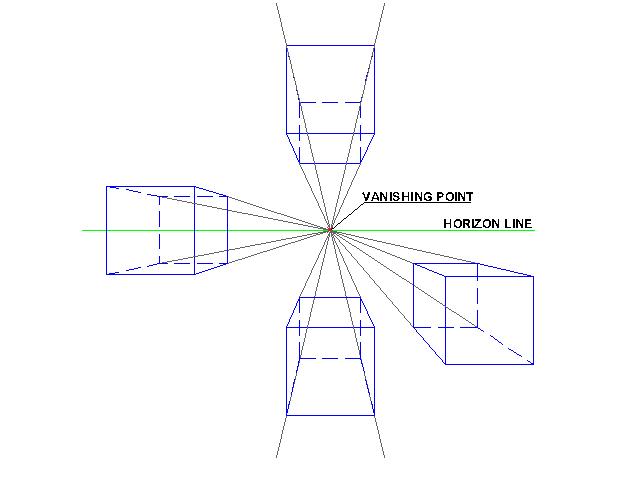
Begin by drawing the front face of the cube, then extend orthogonal lines from its vertices to the vanishing point. Complete the drawing by adding the other faces of the cube, and aligning their edges with the orthogonal lines.
Two-Point Perspective
In a two-point perspective, you can portray objects with two visible sides. Here, two vanishing points are defined along the horizon line. Similar to the one-point perspective, the depth of the objects is visually shortened.
When drawing a cube in a two-point perspective, start by establishing the horizon line. Then, identify the two vanishing points, noting that one of them might extend beyond the drawing sheet in some cases.

Start by drawing the edge of the cube facing you. Extend lines from its vertices to the vanishing points. Next, draw the two adjacent faces of the cube and connect the newly defined vertices to the vanishing points. Finally, complete the drawing by adding the remaining faces of the cube.
Three-Point Perspective
In a three-point perspective, we portray objects with significant height or depth, like towering buildings or cityscapes seen from above. Here, not only do we establish two vanishing points on the horizon line, but a third vanishing point is also determined.
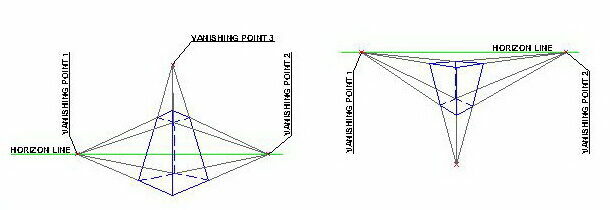
The third vanishing point is positioned on the side of the horizon line closer to us. It’s worth noting that vanishing points aren’t always confined within the drawing; at times, they extend beyond it, especially when they are farther away.
Drawing Circles in Perspective
When drawing a circle in perspective, it transforms into an ellipse. To accurately represent a circle, begin by drawing a square in perspective. Inscribe the circle within this square.

Start by drawing the diagonals of the square and locating the midpoints of its sides. Then, sketch the ellipse within this square, ensuring it aligns with the perspective.
Aerial (Atmospheric) Perspective
As objects recede from the viewer, they appear less distinct, with lighter tones and colors due to atmospheric effects, gradually blending into the background. This phenomenon creates the illusion of depth and distance.
Aerial perspective is a powerful technique for realistically representing three-dimensional space on a two-dimensional surface.
To achieve this effect, distant objects are rendered with less detail compared to those closer to the viewer. The closer an object is, the sharper its lines, and we depict it with greater detail, highlighting vivid tones and colors.
5. Shading And Tonal Rendering
Our ability to perceive light and shadow in drawings is an effective method for visualizing the spatial nature of objects. This technique allows us to transform flat shapes into three-dimensional forms. Shading, in particular, plays a crucial role in enhancing the three-dimensional appearance of objects in a drawing.
Achieving tonal rendering with a pencil or pen and ink can be accomplished through the following methods:
- Shading with One-Way Lines: Apply one or more layers of lines at varying densities, running horizontally, vertically, or diagonally.
- Perpendicular Line Shading: Create shading with lines perpendicular to each other, utilizing two or more layers of horizontal and vertical lines.
- Multilayered Diagonal Shading: Draw lines in two or more layers at different angles to achieve diagonal or angled shading.
- Dotted Shading: Apply shading by drawing dots with different densities.
Remember not to smudge graphite pencil work with your fingers or a blending stump. Applying these shading methods allows for richer tones and more professional results.
However, when working with charcoal or pastel, smudging is permissible. You can use your fingers, a paper towel, or a blending stump for these mediums.
6. Understanding Light and Shadow
When light illuminates an object from one side, it creates a shadow on the opposite side. There are two distinct types of shadows: the form shadow, which manifests on the object itself, and the cast shadow, projecting onto the surroundings.
The cast shadow is darker than the form shadow, which is made brighter by the rays of light reflected from the environment. Light sources can be natural, such as the Sun, or artificial, including lamps, reflectors, candles, or open fire flames.
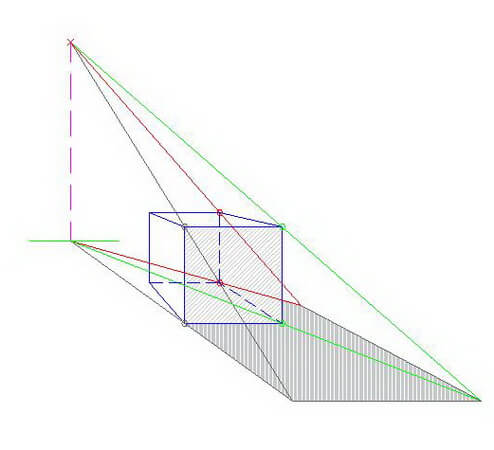
The shape of a shadow is defined by the object’s form, the light source’s position, and the surface on which it falls.
Types of Light Sources
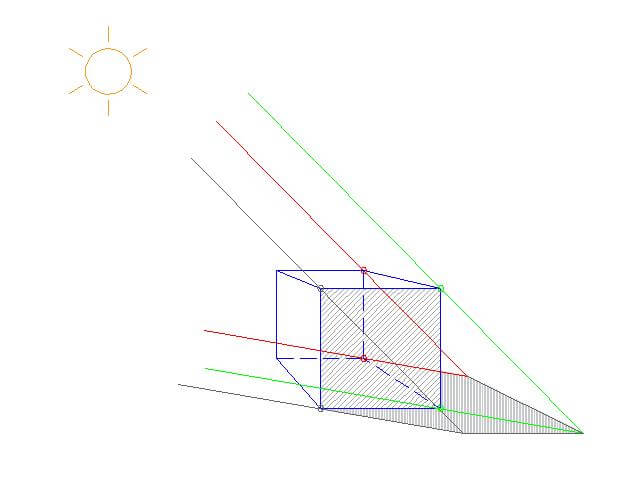
Sunlight produces shadows that align parallel to the picture plane. The angle and direction of the light rays determine the characteristics of these shadows, with the length of cast shadows increasing as the sun lowers on the horizon.
In contrast, when light emanates from a central source, like a lamp, it is diffused. In this scenario, the shadow’s features are influenced by both the angle of the light beam and the distance from the light source’s base point. e.
Beyond the previously mentioned sources, light can also emanate from a moving light source, a linear light source, or multiple light sources.
7. Measurement Techniques and Proportions
When aiming to draw objects proportionally, mastering precise measurement techniques is essential. While a pencil can serve as a measuring tool, a thin, straight stick is also suitable.
Here’s the correct way to measure:
- Ensure your body position remains consistent for each measurement.
- Always measure with your arm outstretched, maintaining a consistent distance between the measuring stick (pencil) and your eyes.
- Keep the distance from which the measurement is taken unchanged.
- Close one eye while measuring, and ensure it’s consistently the same eye.
- Hold the measuring tool perpendicular to your line of sight.
- Slide your thumb up and down to mark the size on the measuring stick.

This method allows you to gauge the proportions of elements and their angles effectively. Choose a specific size, like the width of an object, and determine how many times it fits into the height of the object. Apply these dimensions to mark objects in your drawing using construction lines.
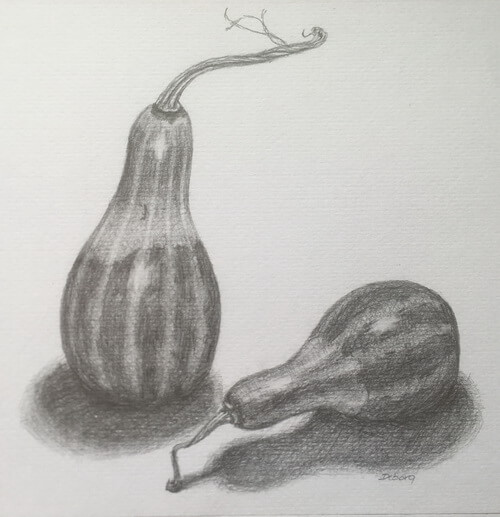
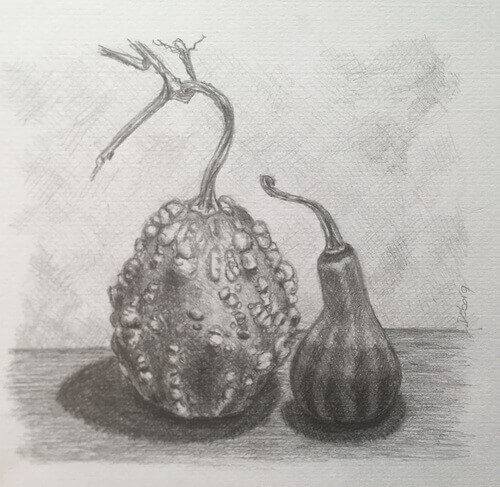
8. Creating a Still Life of Simple Objects
Let’s start by drawing the composition of 2-3 simple objects, illuminated by a central light source coming from above.
- Begin by determining the orientation of the drawing sheet. If the height of the composition is greater than its width, set your drawing sheet to portrait. If, on the other hand, the width is larger, set it to the landscape position.
- Mark the outer boundaries of the composition and proceed to draw the larger shapes, taking care of the proportions and correct placement. At this stage of the drawing, we are still working with faint guidelines. During this stage, use faint guidelines, which can be removed later, or kept for study drawings.
- In the third step, apply faint layers to tone the darkest shadows, halftones, and light tones. Continue working across the entire drawing surface, progressing from larger parts to smaller details.
Never start your artwork by focusing on details. Work from larger shapes to smaller ones, developing the entire drawing simultaneously. This principle applies to hatching and tonal rendering, which should also evolve gradually across the entire drawing.
9. Drawing People and Animals
The skills you’ve gained from the exercises above are a valuable foundation for drawing people and animals, but there’s more to consider.

Understanding body proportions and artistic anatomy is crucial for achieving a realistic representation of both people and animals.
It’s worth noting that relying solely on copying photos is not a recommended professional method. This approach is not sufficient in developing the essential skills needed for drawing from life.
10. Learning from the Masters of Drawing
We can learn a lot from the great masters of the fine arts, so don’t miss this opportunity! Copying the drawings of great artists is a very good way to help you learn drawing.
Even Leonardo da Vinci, in his notes, advises novice artists to begin their learning process by copying the works of the great masters. Pay attention to the lines they use, their shading techniques, and the principles of artistic composition they applied in their artwork.
The internet provides an accessible source for finding drawings from old masters, which are in the public domain and can be freely utilized. Consider learning from the drawings of iconic figures such as Michelangelo Buonarroti, Leonardo da Vinci, Albrecht Dürer, and John Singer Sargent.
Final Thoughts
As mentioned earlier, drawing skills are something you can acquire and refine over time. It involves learning the basics and, most importantly, consistent practice. If your drawings aren’t perfect right away, don’t be discouraged.
Through persistent practice, your confidence will grow, and your drawings will gradually improve. Drawing offers numerous benefits across various aspects of life.
Immerse yourself in drawing as much as possible; the world around us is full of inspiration. And for additional insights on this topic, here’s an article on what subjects beginners should start drawing.
Share your thoughts and insights by leaving a comment below. If you found this article valuable, consider sharing it on your social media platforms, and feel free to explore more insightful articles on our website.

Debora
My name is Debora, and I’m the founder of Drawing Fundamentals. I work as a civil engineering technician. I acquired the basic knowledge necessary for freehand and technical drawing during my school training, further developing and perfecting these skills throughout my years in the profession. Through my blog, I aim to assist anyone interested in learning to draw.